AURSINC
AURSINC Radioberry Preamp Board V2, A Addition to Turn The Radioberry into a Small QRP Radio, HF Power Output 3W-5W for HF Amplification (10W-100W PA), for Raspberry pi 4,4b
AURSINC Radioberry Preamp Board V2, A Addition to Turn The Radioberry into a Small QRP Radio, HF Power Output 3W-5W for HF Amplification (10W-100W PA), for Raspberry pi 4,4b
Couldn't load pickup availability
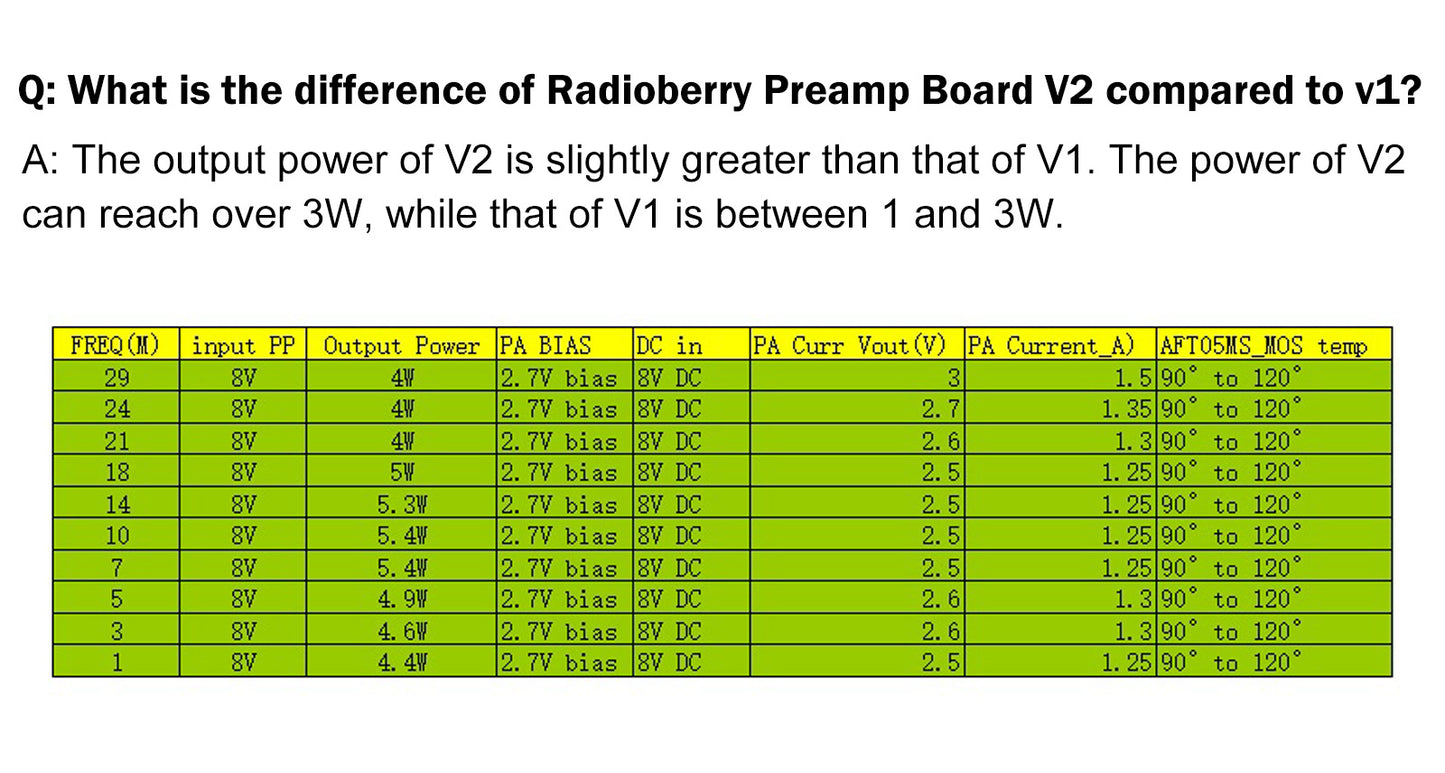
- New Version V2: The output power of the amplifier board V2 is slightly higher than that of the previous version, with V2 reaching 3–5W. Technical Specs: Power in 6-8V (8.4V preferred); HF Power in: Tx from radioberry; HF Power out: 3-5W for for HF amplification. RF range: 1mhz-50mhz. Port Type: Input SMA, Output SMA. Supports SSB, FM, and AM
- Designed for Radioberry SDR: This radioberry preamp board V2 is a nice addition to turn the radioberry into a small QRP radio. Seamless compatibility with Radioberry boards, making it a clean plug-and-play-style expansion, increased capability for your Radioberry
- Amp board integrates with RPi 4: Pairs with Pi 4/4B for those building a Raspberry Pi-based QRP SDR radio, combining digital signal processing and radio functionality in a small form factor
- What's Inside: 1x Radioberry Preamp Board; 3x SMA cable (1 for Rx ,1 for Tx,1 for ANT); 1x 8V Battery-powered Wire; 1x Connecting Row Needle; 4x Screw and Nut; 8x Plastic Column. Compact & Lightweight: Ideal for portable SDR radio setups, field use, or minimalist shack builds
- Notes for prolonged continuous transmission: The bias voltage needs to be adjusted, and a range of 2.4–2.5V is safe. Additionally, adding a small fan for heat dissipation is recommended for better performance. For WSPR, there’s a simpler method that can be achieved using an RP2040 + GPS. Please search for “RP2040 GPS” for details
- Important Note: A Certain Level of Professional Knowledge Is Required for the Use of This Product. This product is open-source. Our instructions only cover fundamental configuration. For extra functions and customized settings, further independent exploration is required. You may consult us for technical support
PreAMP PA for Radioberry — Setting and Output Guide | FPVGame Docs
Download the dedicated test image and run it directly for reception:
https://drive.google.com/file/d/1RzKAeha6EW8e4WeDlxpYBMPwdu-GsVZJ/view?usp=drive_link
Radioberry PAv2 Test: https://jumbo5566.github.io/pro/rb/2024/04/17/rb016_025.html
HOW to Work
① ENABLE PA on SparkSDR

① Radio Setting

FQA
1. Schematic diagram

if TX LED only ON just Power ON, Pls use our windows_gateway.zip
some radioberry.rbf don't work with PA mode, BIAS and ENVPA must HIGH on TX or TUNE
Test with SPARKSDR USB Connect Juice RBV2 only work 10CL025
2. What voltage do I set the bias pots for and what is the procedure to do this.
Set to 2.7V, press Tune, and adjust the relay when you hear a sound during transmission. Counterclockwise to increase, clockwise to the minimum first.
3. What types of modulation does Radioberry use for transmission?
Supports SSB, FM, and AM
4. Where is the microphone input?
For use with Radioberry, the microphone input is managed via computer software or Raspberry Pi software.
5. Notes for prolonged continuous transmission:
The bias voltage needs to be adjusted, and a range of 2.4–2.5V is safe. Additionally, adding a small fan for heat dissipation is recommended for better performance.
For WSPR, there’s a simpler method that can be achieved using an RP2040 + GPS. Please search for “RP2040 GPS” for details.